I recently had to set up a HashiCorp Vault server for a client. Due to the requirements, I got to do some new things with regards to Vault authentication. Some of the stated requirements were:
- Authentication to Vault should be done by using Azure Active Directory
- Use of Azure AD Application Roles for permissions instead of groups
- Configure Vault via Terraform
While I’ve done quite a bit with Vault and OAuth 2.0/OpenID Connect, I’ve never had to use OIDC as an authentication backend in Vault. The few setups I’ve done before all used LDAP as their external authentication source.
Thankfully, the documentation for setting up Azure AD authentication is quite clear. It describes all the steps to take. This post makes use of the information, but adapts it to the requirements and uses Terraform to apply the configuration to Vault.
This post assumes that the reader has some knowledge of Terraform, Azure AD and Vault. I won’t be detailing how to set them up or work with these tools. The examples in this post will focus solely on the authentication configuration. A more complete example containing among others, policy definitions, can be found in my GitHub.
Start the Vault Server
Let’s start with the easy part: starting a development Vault server. If you don’t know how to install Vault, there is a guide on the Vault site.
Before starting the server, we’re going set some variables. Create a GUID to serve as the root token. The token gives you root permission in Vault. Set the VAULT_ADDR environment variable to http://127.0.0.1:8200. This environment variable tells the client where to reach the running Vault server. As some troubleshooting may be required, the log level is set to debug.
❯ $rootToken = New-Guid
❯ $env:VAULT_ADDR =  "http://127.0.0.1:8200"
❯ vault server -dev -dev-root-token-id $rootToken -log-level debug
The server is now started and will output to stdout. If you ever need to reauthenticate as the root user, use the vault login command and enter the root token after the prompt.
Setting up the Azure AD Application
To log in to Vault with Azure AD, we need an App Registration and an Enterprise Application. The configuration of Azure AD will be done via the Azure Portal. This simplifies the setup as it does some things under the hood we might have to do manually otherwise. Furthermore, it’s quite possible that the person setting up Vault doesn’t have access to Azure AD.
- Create the App Registration. This automatically creates the Enterprise Application as well.
- Configure both redirect URIs in the App Registration.
http://localhost:8250/oidc/callbackfor CLI access.http://localhost:8200/ui/vault/auth/oidc/oidc/callbackRegisterfor the web UI. If the server is not running locally, adjust the protocol, FQDN and port accordingly.
- Copy the following information from the App Registration:
- The Application/Client ID in the ‘Overview’ section
- The ‘OpenID Connect metadata document’ URL found by clicking ‘Endpoints’ in the ‘Overview’ section.
- A client secret generated in the ‘Certificates & secrets’ section.
Two steps from the documentation can be ignored as we’ll be using Azure AD Application Roles. First, no additional API permissions need to be granted. Second, no group membership claims need to be provided either. This means that in the ‘Manifest’ in the sidebar, groupMembershipClaims's value should remain null.
Setting up the Azure AD Application Roles
App Roles have some advantages over using group claims. Most Enterprises end up with users being members of lots of groups. So many even, that often the groups don’t all fit in a token. One option to fix this is to increase the token size limit, but increasing the limit isn’t a fix in all scenarios. By mapping users and/or groups to a few Azure AD Application Roles, only the roles assigned to the user for this app get added to the token, keeping the token size small.
App Roles are configured in the manifest file. For details on their structure, look at the documentation. In our case, we’re going to create two Roles: VaultUser and VaultAdmin. To do this, add the following JSON to the appRoles attribute in the App Registration Manifest:
"appRoles": [
  {
    "allowedMemberTypes": [
      "User"
    ],
    "description": "Administrators can manage Vault",
    "displayName": "VaultAdmin",
    "id": "3f94b3c9-b6f3-48a9-bc88-5dfa85fb100d",
    "isEnabled": true,
    "value": "VaultAdmin"
  },
  {
    "allowedMemberTypes": [
      "User"
    ],
    "description": "Users can access Vault",
    "displayName": "VaultUser",
    "id": "8a4ebd97-ae67-40f2-9b7b-184c216dc0d0",
    "isEnabled": true,
    "value": "VaultUser"
  }
],
The id attribute is a GUID. This GUID must be unique within the manifest. The value of the Value attribute is what is added to the role claim.
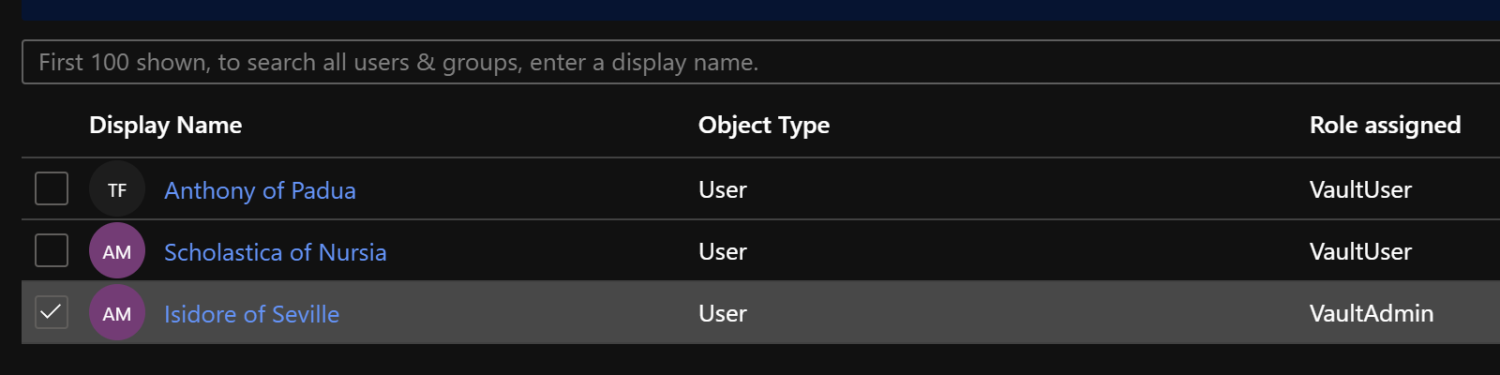
To assign the App Role to users or groups, go to the ‘Enterprise Application’, open ‘Users and groups’ and add a group or user. Here, select one of the previously defined roles to attach to the groups or users.
You’ll end up with a screen similar to this screenshot after assigning the App Role:
Configure authentication with Azure AD in Vault
To configure the authentication backend in Vault, we’ll need the client ID, metadata URL and the client secret we copied from the Azure AD App Registration.
We’ll use use the vault_jwt_auth_backend Terraform resource and fill in the correct values.
pathcan be anything, but using the default ofoidcmakes everything easier.typemust be set tooidc.- The
oidc_discovery_urlis the manifest URL, without ‘.wellknown/openid-configuration’. oidc_client_idis the client ID found in the overview andoidc_client_secretis the generated secret.
The resource should be placed in a file named ‘main.tf’. This is what the resource ends up looking like:
# main.tf
resource "vault_jwt_auth_backend" "azure_oidc" {
  description = "Azure Authentication"
  path        = "oidc"
  type        = "oidc"

  oidc_discovery_url = "https://login.microsoftonline.com/e9c80aca-2294-4619-8f10-888f8b6682e8/v2.0"
  oidc_client_id     = "6d14e904-1d87-483e-82e3-8bc513e15c0d"
  oidc_client_secret = "2n08rIqfH=PJ@pGy_jh3!eNSFC?_Vh_9"
}
NOTE: In production, don’t specify the secret in the template. Use a secret store like Vault.
This configures the auth backend, but logging in isn’t possible yet. We need to configure at least one Vault OIDC role to allow that.
Grant basic access with an OIDC role
An OIDC role in Vault defines restrictions on who can log in to Vault and which permissions they’ll acquire by using claims. Multiple roles can exist for a given OIDC auth backend and each role can grant different permissions via the policies assigned to a Vault OIDC Role.
A role also defines the contract between Vault and Azure AD, specifying the expected information and the redirect URIs.
We’re going to keep things simple and specify no restrictions, allowing all users in the Azure Active Directory tenant to log in and receive the default permissions.
To configure the OIDC Role, use the vault_jwt_auth_backend_role resource.
- The
user_claimshould beemail. - The
role_typeisoidc - the
allowed_redirect_urisshould be the same as what was configured in the App Registration. - To make use of the role claims, set the
groups_claimtorolesinstead ofgroups. - The required scopes for Azure AD are the default OIDC scopes
profileandemail, as well as the Azure specifichttps://graph.microsoft.com/.default.openiddoesn’t need to be specified as it’s included by default.
This results in a resource that looks like this:
# main.tf
resource "vault_jwt_auth_backend_role" "azure_oidc_user" {
  backend        = vault_jwt_auth_backend.azure_oidc.path
  role_name      = "oidc"
  token_policies = ["default"]

  user_claim            = "email"
  role_type             = "oidc"
  allowed_redirect_uris = ["http://localhost:8250/oidc/callback", "http://localhost:8200/ui/vault/auth/oidc/oidc/callback"]
  groups_claim          = "roles"
  oidc_scopes           = ["https://graph.microsoft.com/.default", "profile", "email"]

  verbose_oidc_logging = true
}
NOTE: Don’t set
verbose_oidc_logging = truein production. This logs sensitive information to stdout and the audit logs. Use it only to troubleshoot the setup of the authentication.
Add this to the main.tf file and apply the Terraform configuration with terraform apply. If everything went well, logging in should now be possible.
Testing the login
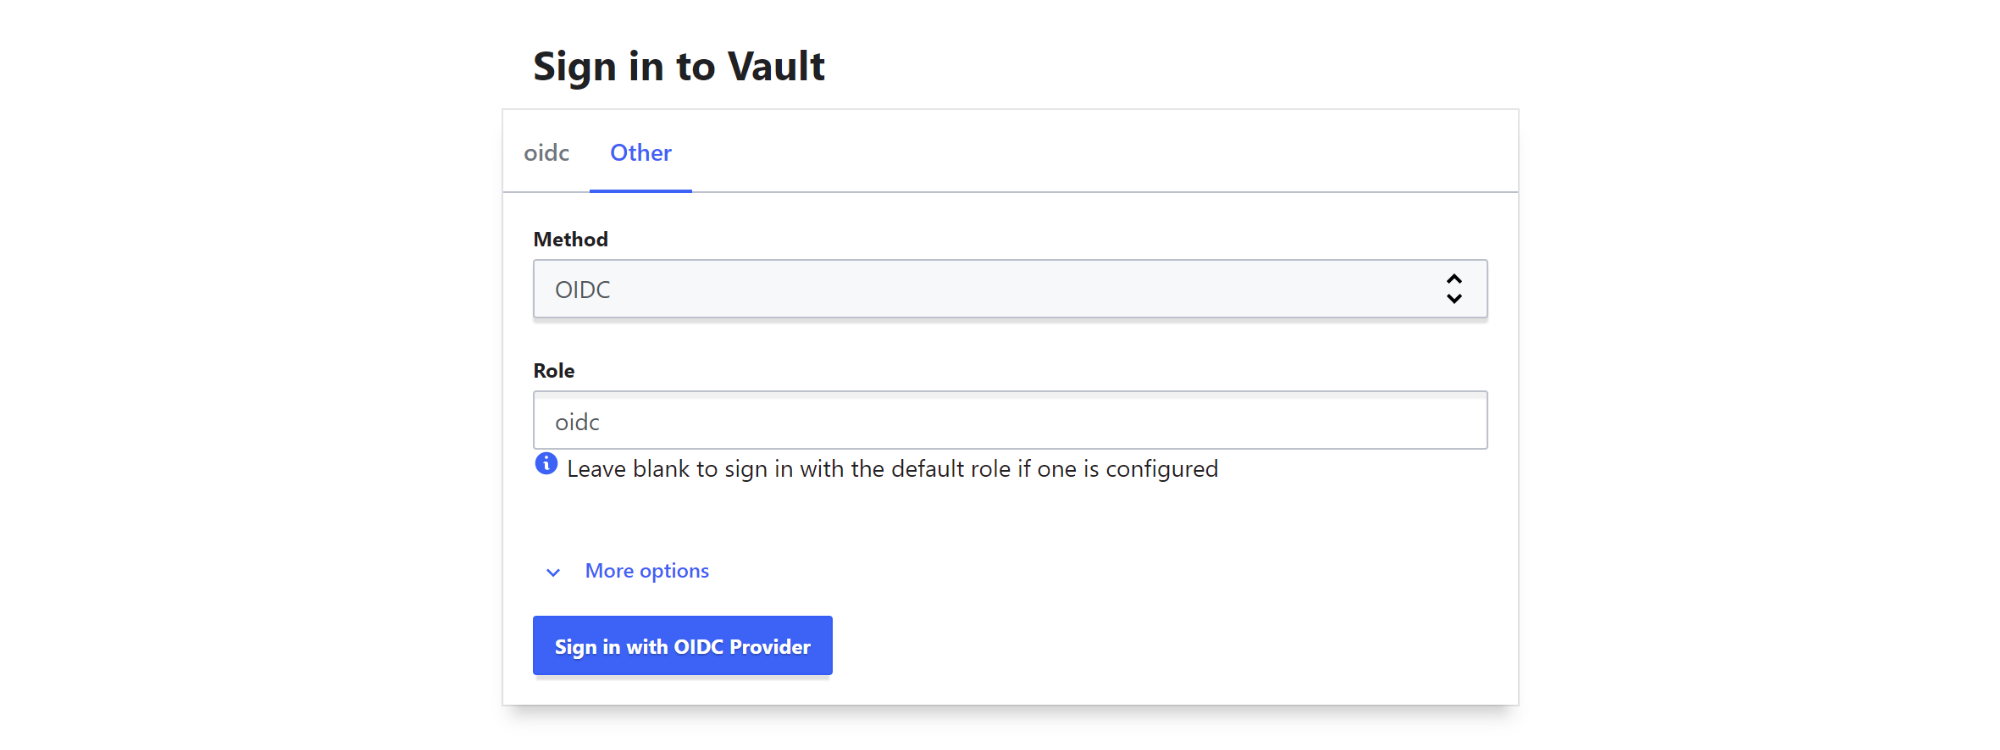
To log in to the web UI, visit the website - in this case http://localhost:8200 - select ‘OIDC’ as the login method and type ‘oidc’ as the role, then click on ‘Sign in with OIDC Provider’.
Logging in via the CLI is equally simple. Use the vault login command with -method set to oidc and role=oidc as a key-value pair to log in.
The role parameter allows a user to specify their desired OIDC role to assume. The value to specify is the value of role_name configured on the vault_jwt_auth_backend_role resource.
Type the command listed below and press enter. Your default browser should pop up, allowing you to authenticate. After logging in with user ‘Isidore’, this is the CLI output.
❯ vault login -method oidc role=oidc
[...]
Success! You are now authenticated. [...]

Key                  Value
---                  -----
token                s.VMuTszWc8xSswCuhfGmoScLy
token_accessor       rbbsrBCb2b4jCjwtiB4HGpZV
token_duration       768h
token_renewable      true
token_policies       ["default"]
identity_policies    []
policies             ["default"]
token_meta_role      oidc
Success! We have logged in; however, we only received the default policy. Let’s fix this.
Map the App Roles to external groups
Now that the login is successful, we need to assign permissions in Vault based on the received App Roles. To do this, we must use the concept of identity groups in Vault. Read the documentation on them to learn more.
As the group information comes from Azure AD, we must use external groups and assign them aliases pointing to the roles in Azure AD. This must be done for any App Role we want to assign permissions to. In this case, these are the ‘VaultUser’ and ‘VaultAdmin’ roles.
To create the external groups, we’ll use the vault_identity_group resource. The groups will be named ‘user’ and ‘admin’. Add the below config to the main.tf file.
# main.tf
resource "vault_identity_group" "user" {
  name     = "user"
  type     = "external"
  policies = ["user"]
}

resource "vault_identity_group" "admin" {
  name     = "admin"
  type     = "external"
  policies = ["admin"]
}
We previously logged in with the user ‘Isidore’. This account won’t allow for configuration of Vault. We first need to switch to the root user with the vault login command before applying the configuration.
After applying the above config, we now have two external groups in Vault. Each assign their highlighted policies to anyone or any group that is a member of the external group. To couple our OIDC roles to the external groups, we need to create aliases telling Vault that the OIDC roles received in the token, are part of specific external groups. Use the vault_identity_group_alias resource to accomplish this.
# main.tf
resource "vault_identity_group_alias" "user_alias_azure_vault_user" {
  name           = "VaultUser"
  mount_accessor = vault_jwt_auth_backend.azure_oidc.accessor
  canonical_id   = vault_identity_group.user.id
}

resource "vault_identity_group_alias" "admin_alias_azure_vault_admin" {
  name           = "VaultAdmin"
  mount_accessor = vault_jwt_auth_backend.azure_oidc.accessor
  canonical_id   = vault_identity_group.admin.id
}
Add the above config to the .tf file and apply the configuration with terraform apply. Once done, we can try to log in with the user ‘Isidore’.
❯ vault login -method oidc role=oidc
[...]
Key                  Value
---                  -----
token                s.PiYuUkROgViEt57SWYbmqYZd
token_accessor       ueK4MVhRWXRUHMe7jCXfqGL7
token_duration       768h
token_renewable      true
token_policies       ["default"]
identity_policies    ["admin"]
policies             ["admin" "default"]
token_meta_role      oidc
Great! Logging in with Anthony and Scholastica also gives the correct identity_policies of ["user"]. This means that our work here is almost done.
Tidying up and conclusion
We can improve the user experience with a small tweak. Currently we need to specify the role each and every time we log in. To fix this, we’re going to make the oidc role the default by adding default_role = "oidc" to the vault_jwt_auth_backend resource:
# main.tf
resource "vault_jwt_auth_backend" "azure_oidc" {
  description = "Azure Authentication"
  [...]

  default_role = "oidc"
}
Switch to the root user before applying the configuration.
This will save some typing on both the web UI and the CLI. To log in via the CLI, omit the role key to use the default role:
vault login -method oidc
And we’re done! I hope this article was helpful in some way. Until next time